 Frete Grátis em todos os produtos


Descrição do Produto: Kit de Reparo de Cabo de Fechadura de Porta OEM para Veículos Ford
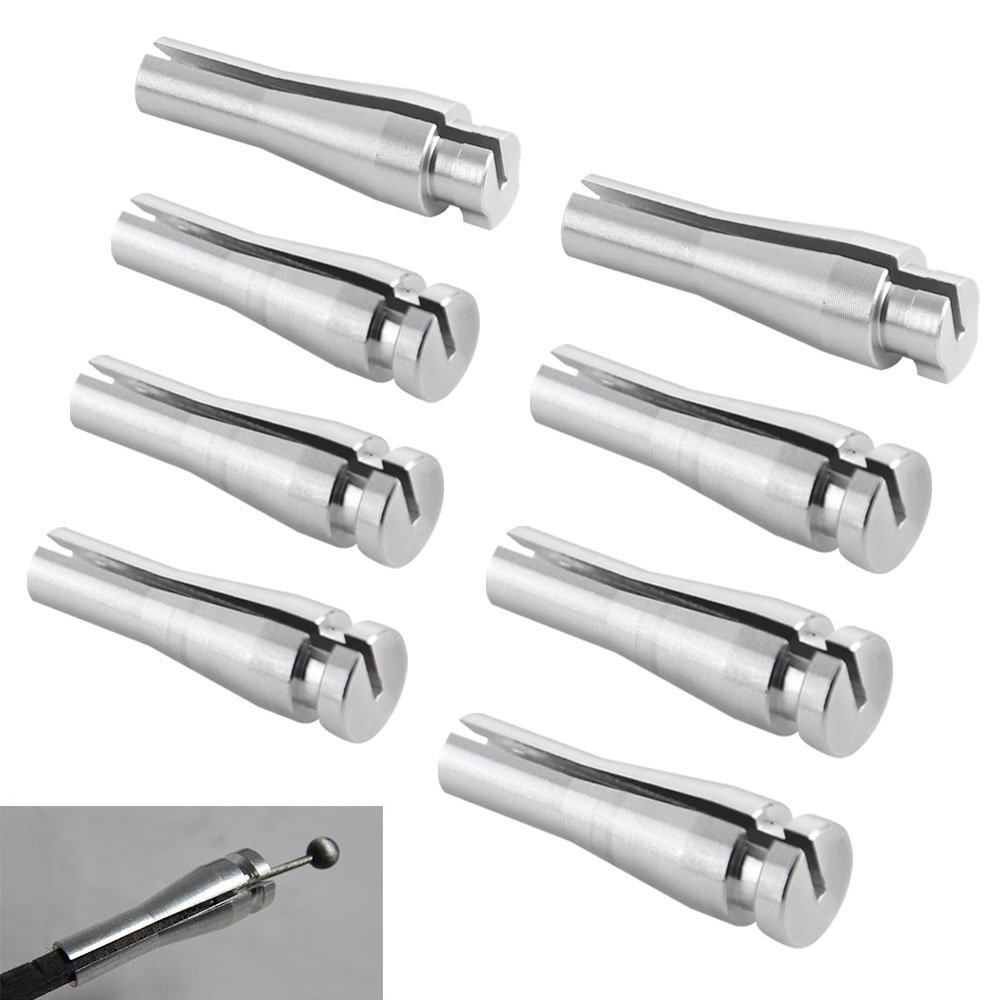
O Kit de Reparo de Cabo de Fechadura de Porta OEM é a solução ideal para quem busca eficiência e economia na manutenção de veículos das linhas F-series, E-series, Ranger, Expedition, Excursion e Navigator. Com um total de 8 extremidades, este kit permite reparar até 4 cabos de porta, tornando a instalação uma tarefa simples que pode ser realizada em poucos minutos, sem a necessidade de substituir os caros cabos de porta originais. Isso significa uma economia significativa, evitando gastos excessivos com peças OEM.
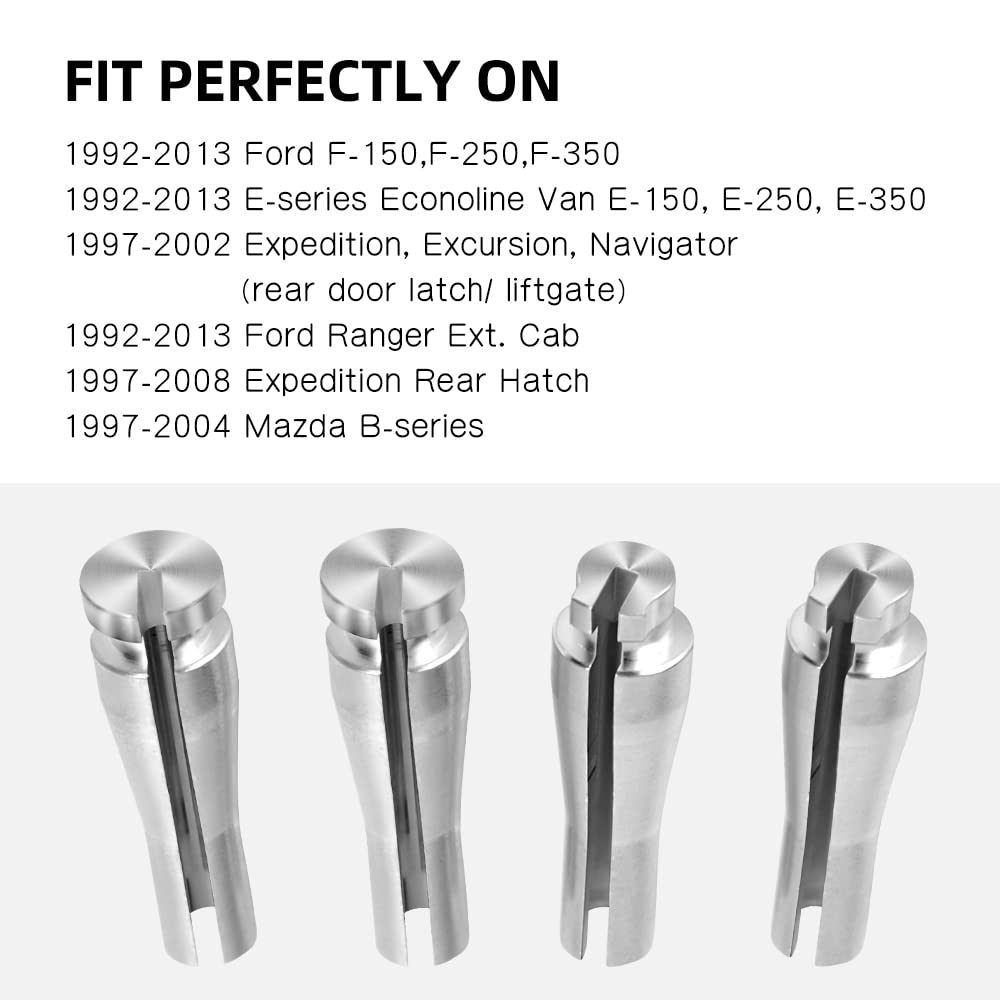
Fabricado em alumínio billet 6061 T6 de alta qualidade, o kit é leve, mas extremamente resistente, garantindo durabilidade e confiabilidade. Ele pode ser utilizado para consertar cabos de porta quebrados em diversas aplicações, incluindo portas de passageiros, portas de carga, liftgates, portas suicidas, caçambas e portas traseiras. Este produto é compatível com uma ampla gama de veículos, abrangendo modelos de 1992 a 2013, como as vans E-Series (E-150, E-250, E-350), caminhões F-Series (F-150, F-250, F-350), Ford Ranger Cabine Estendida, e SUVs como Expedition, Excursion e Navigator.
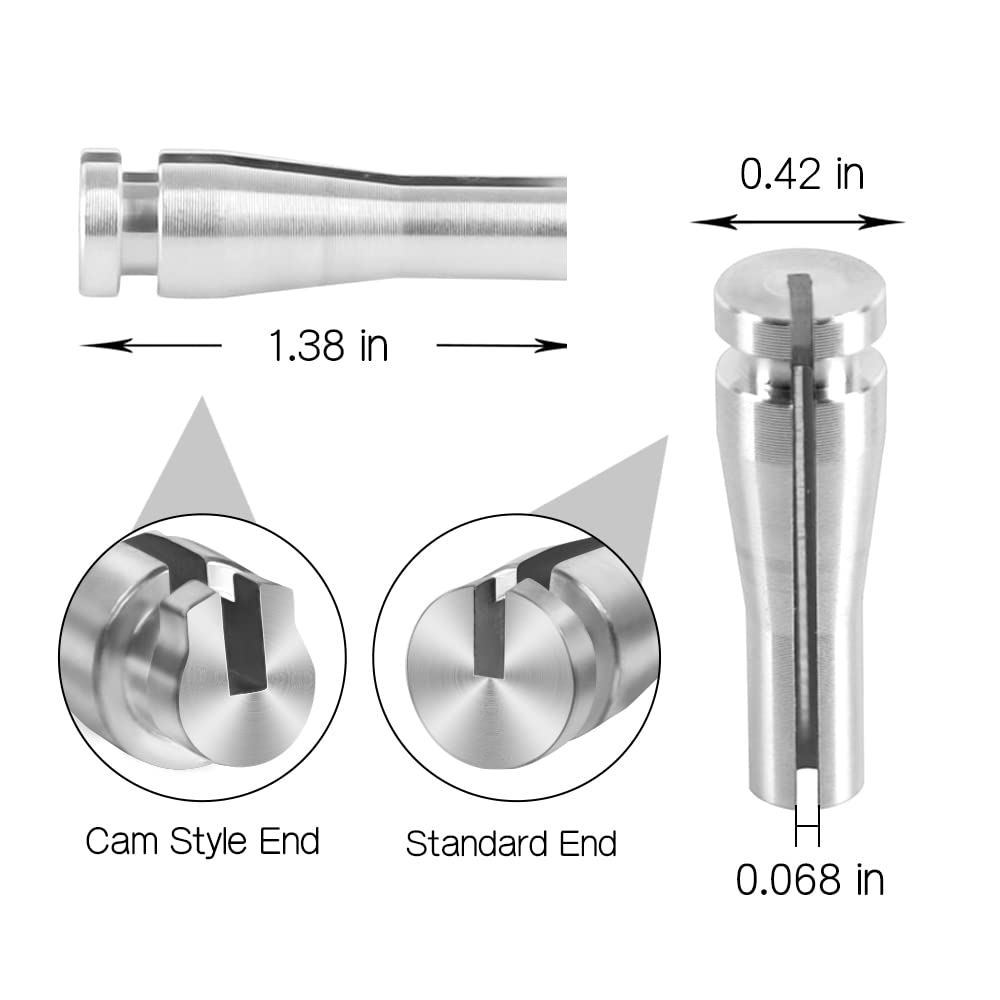
O pacote inclui 6 extremidades padrão e 2 extremidades de trava, proporcionando uma solução permanente que durará toda a vida útil do veículo, eliminando a necessidade de substituições frequentes. Além disso, oferecemos uma garantia de satisfação de 100%. Se você não estiver completamente satisfeito com sua compra, entre em contato conosco e faremos o possível para resolver a situação.
Instruções de Uso:
Para utilizar o Kit de Reparo de Cabo de Fechadura de Porta OEM, siga os passos abaixo:
1. Remova a Forração da Porta: Utilize uma chave de fenda para remover cuidadosamente a forração da porta, expondo os cabos de fechamento.
2. Identifique o Cabo Quebrado: Localize o cabo que está danificado ou quebrado.
3. Desconecte o Cabo Antigo: Desconecte o cabo quebrado das extremidades, tomando cuidado para não danificar outras partes.
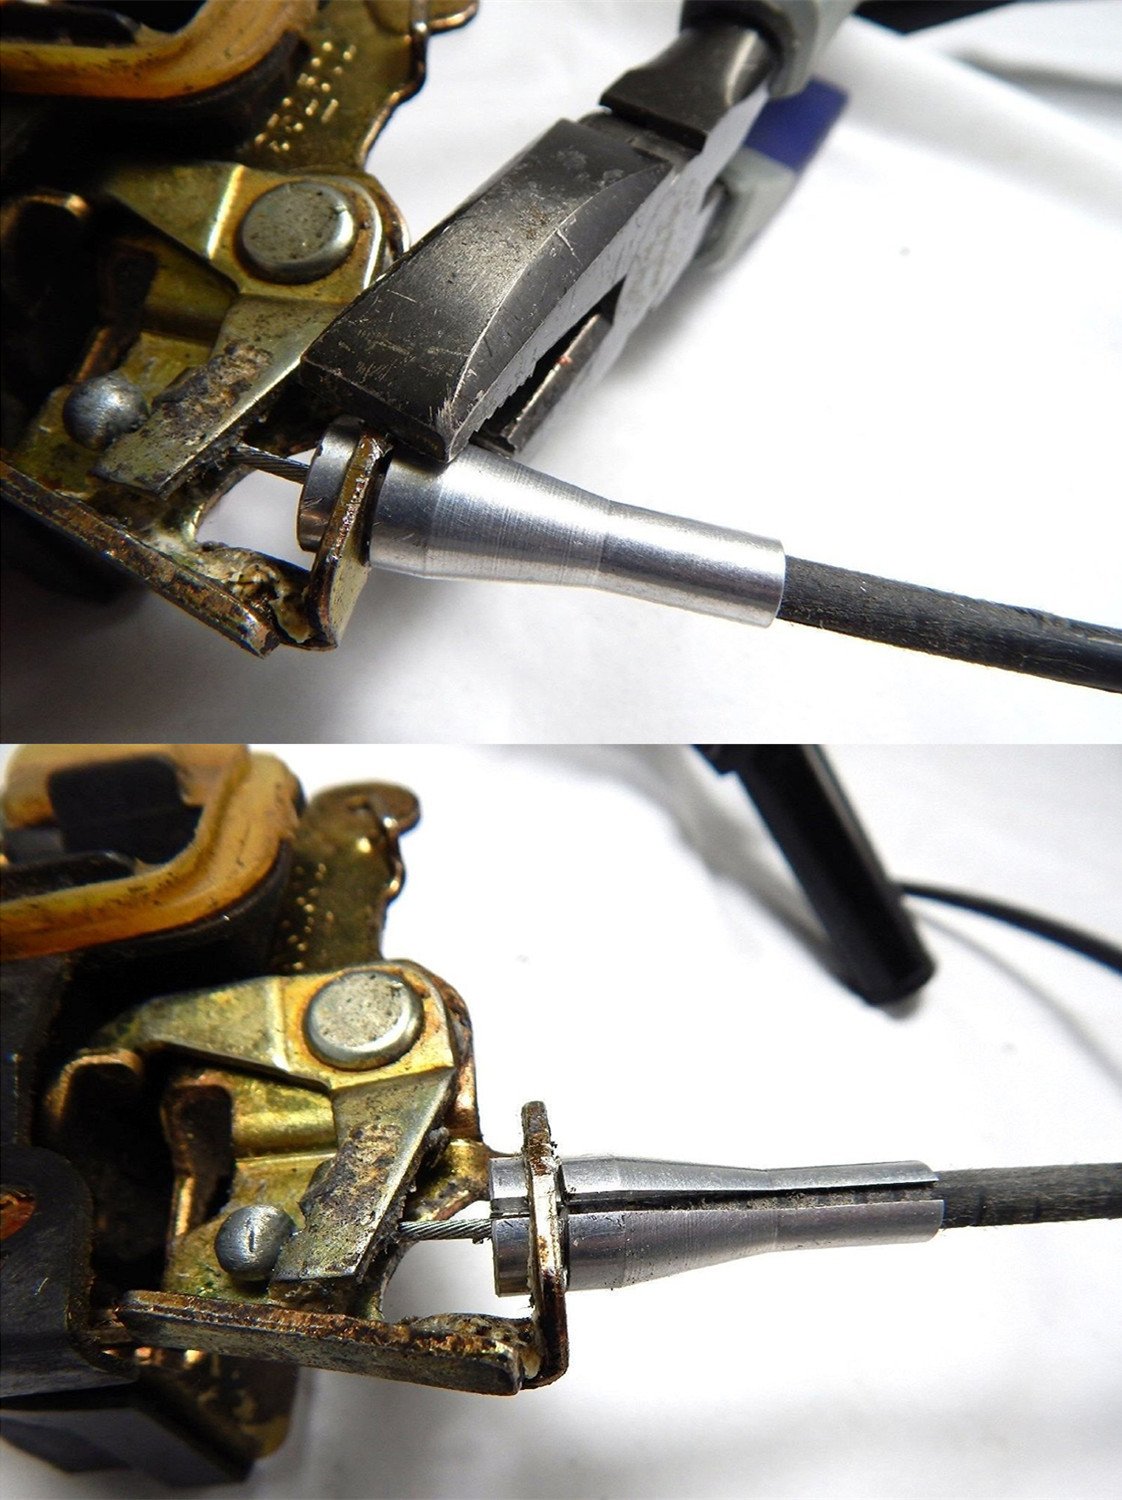
4. Instale as Novas Extremidades: Utilize as extremidades do kit para conectar o novo cabo. Certifique-se de que as extremidades estejam firmemente fixadas.
5. Teste o Funcionamento: Antes de recolocar a forração, teste a porta para garantir que o mecanismo de fechamento esteja funcionando corretamente.
6. Recoloque a Forração: Após confirmar que tudo está funcionando, recoloque a forração da porta.
Características do Produto:
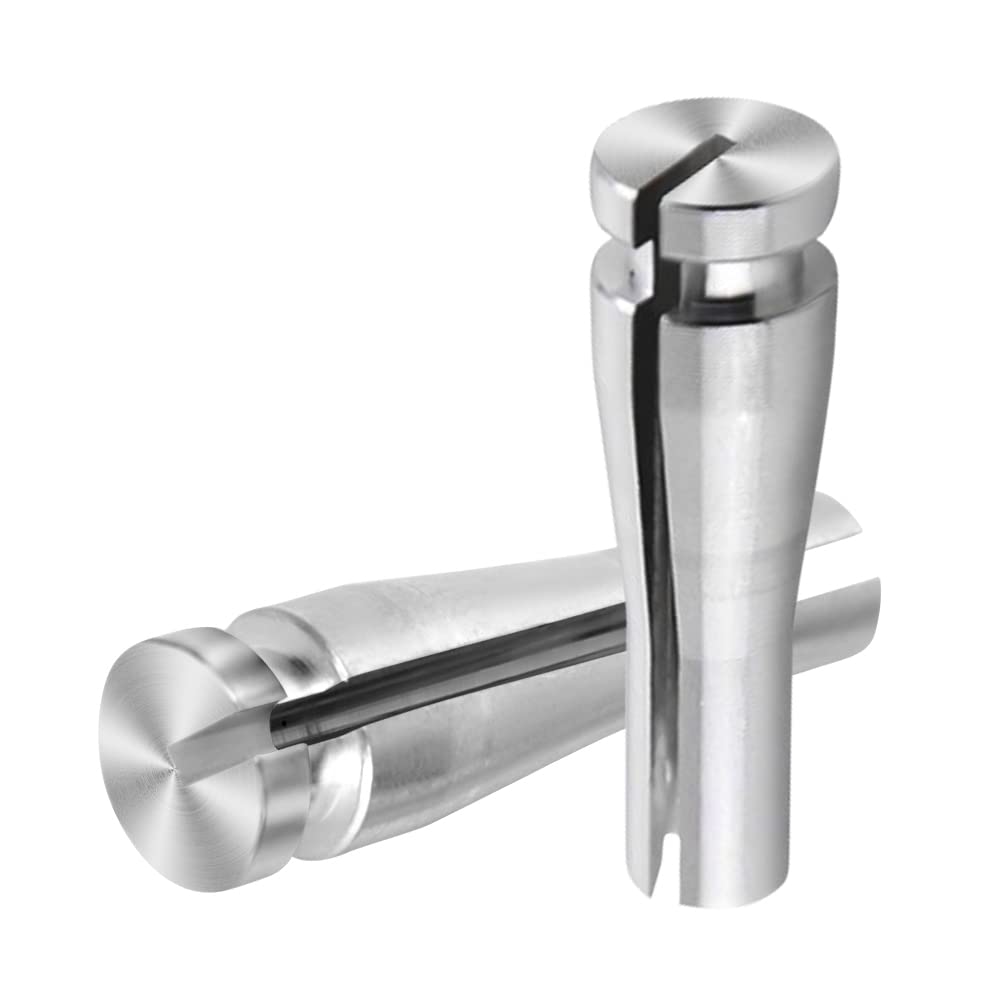
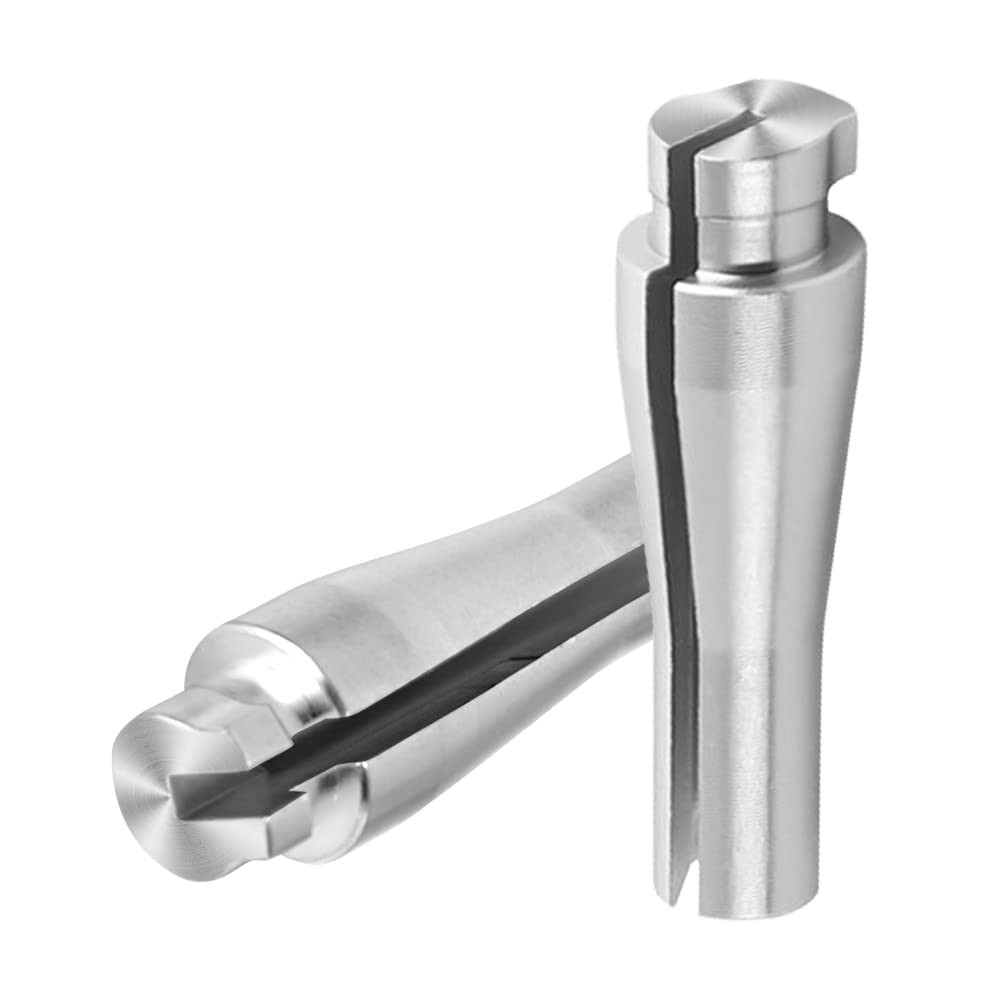
– Material: Alumínio billet 6061 T6, leve e resistente.
– Compatibilidade: Projetado para veículos Ford de 1992 a 2013, incluindo E-Series, F-Series, Ranger, Expedition, Excursion e Navigator.
– Conteúdo do Pacote: 6 extremidades padrão e 2 extremidades de trava.
– Durabilidade: Substituição permanente que não requer manutenção frequente.
– Instalação: Fácil instalação em poucos minutos, sem necessidade de ferramentas especiais.
Perguntas Frequentes (FAQ):
Pergunta: Este kit é compatível com meu veículo?
Resposta: O kit é compatível com uma ampla gama de veículos Ford de 1992 a 2013, incluindo E-Series, F-Series, Ranger, Expedition, Excursion e Navigator. Verifique a lista de compatibilidade para garantir que seu modelo esteja incluído.
Pergunta: É difícil instalar o kit?
Resposta: Não, a instalação é simples e pode ser feita em poucos minutos. Você só precisa de ferramentas básicas, como uma chave de fenda, e seguir as instruções fornecidas.
Pergunta: O que fazer se eu não estiver satisfeito com o produto?
Resposta: Oferecemos uma garantia de satisfação de 100%. Se você não estiver completamente satisfeito, entre em contato conosco e faremos o possível para resolver a situação.
Pergunta: O kit pode ser usado em portas de carga?
Resposta: Sim, o kit é versátil e pode ser utilizado para reparar cabos de portas de carga, liftgates, e outros tipos de portas.
Pergunta: Qual é a durabilidade do material?
Resposta: O alumínio billet 6061 T6 é conhecido por sua resistência e durabilidade, garantindo que o kit dure toda a vida útil do seu veículo.


Dave in AL –
I purchased these to install in my 2005 Ford Ranger. They were not the easiest items to install but I’m sure that even including my time it was considerably cheaper than to have Ford or anyone else install.
The parts were very easy to install once that point was reached, but getting to that point was more difficult. It took several attempts to install for each suicide rear door, primarily due to finding the order to install the parts in order to obtain enough space to install each piece on the actuating cable. The slots in the parts for the cables were too small for the cable housing, so in lieu of widening the slots as others had done, I cut the plastic cable covering off of the inner metal sheath for a length equal to the the length of the slot it was to fit into. This allowed the sheath to fit the parts perfectly. These were not easily installed as I failed to consult with the University of YouTube first. All in all it took about 7 hours to fix both doors, but this time also included: 1) several breaks to get out of the hot sun, 2) a few breaks to try different plans of attack, 3) opening the door that factory components had failed on, and, 4) I’m well past retirement age. If you are replacing one, go ahead and replace all of them as they are all the same age and will soon fail if you don’t. Also, it was very beneficial to have trim removal tools that I had already purchased.
Walks with Chickens –
Worked well, installed quickly, one did slip a bit, but that’s likely because I rebuilt a latch.
Amazon Customer –
I use this kit to fix my 2000 ford expedition lift gate and window opening cables. Worked great! Shipping was fast. Great item. Priced right!
mary waterman –
Did exactly what I needed them to do
bagoggans –
Both of my cargo doors (aka suicide doors) on my 2006 Dodge Dakota SLT Extended Cab truck failed. Even though the description did not say that it was for my truck, I searched the web and found that it was indeed what I was looking for to fix my problem. The weak plastic ends for the two cables (4 total for both doors) that control the release of the upper and lower door latches crack and break and because of this, it won’t allow the latches to release properly. If you only have 1 broken door cable end now, I HIGHLY HIGHLY HIGHLY recommend you do both doors now (all 4 cables) and save yourself the headache and pain later on with having another door you cannot open easily.
While I would consider this failure to be a safety issue and SHOULD be a recalled item by the NHTSA, it won’t be even though it affects SO SO SO many vehicles! I mean, you CANNOT open the doors when the weak plastic ends break off, and eventually they will. At that point, anyone in the back seat cannot get out of the vehicle quickly and easily as they should be able to do. It is CLEARLY a design flaw using such a weak inferior component to secure the cables in place and the automotive manufacturers should look somewhere else to save a few pennies when making the cars. But you know, save that nickel no matter how much it may cost you later, eh? Bean Counters and Lawyers……yeesh!
Installation is a PITA if your cables are already broken and you cannot open the doors. This is not a fault of the product nor the seller. This is just a fact. The installation only getting 3 stars is a reflection of the actual job itself, and does not reflect negatively on the product or the seller. It also asked for “Sheerness” in the review, and because I have no idea WTH that means, I did not answer it. Again, it does not reflect on the product or seller. At least, neither one should.
If your door(s) still open because you are replacing the faulty items before they break – SMART ON YOUR PART!!! I WISH I HAD!!! Then it is not so bad. Open the door(s) and skip to step 9 after removing the 6 phillips screws from the door trim panel. Understand that once you have it all apart, if ANY side of your cable ends (4 ends total) is broken, you will need to ALSO order a replacement cable for each broken cable. You really cannot fix a broken cable end, but almost always, this will not be the case. The cheap plastic ends will be the busted part about 98% of the time. If you open the doors by hard yanking the crap out of them, then you just might pop a cable end off. This review does not cover cable replacement – only cable end attachment replacement.
Because the 2006 Dodge Dakota trim for the doors requires you to have the door open to remove it, you have to play a game. There are some nice videos on the web if you don’t want to read all of this.
1) Slide the driver seat (and/or passenger seat) fully forward. Pop the lever to lean the seat forward to give you as much room as you can get to work in.
2) Remove the 2 bolts holding the seat belt harness to the roof. You DO NOT have to take down the ceiling to do it. You DO need a T45 (I recommend one that attaches to a 1/2 socket wrench with at least a 6″ extension to give you some leverage to break it loose – I use a cheater bar added to my socket wrench for that first loosening bit).
3) remove 4 of the 6 phillips head screws – 2 at top (one was covered by seat belt harness) and 2 in the middle.
4) CAREFULLY pop the plastic trim out of the top and middle clips. Lean the whole trim piece forward allowing you to see the hole where you will reach into.
5) Reach into the lower hole and you will feel a lever on the lower latch that you pull up on to release. It may only release 1/2 way (designed to catch like that to prevent accidental openings). You will hear it pop and the door will shift outward some when you get the right one.
6) Reach into the upper hole and pull on the cable just below the upper latch mechanism. Again, it may only pop and open 1/2 way. This step does assume that your cable end is OK and is still in the latch mechanism. If not you will have to manually release the upper latch mechanism, and I am sorry, I am not sure how that is done as I did not have to do that.
7) Keeping pressure on the door (pushing it out), repeat 5 and 6 until the door opens.
8) At this point, unscrew the last 2 phillips head screws at the bottom of the trim and place it aside for later. At this point, you may want to go ahead and check all of the snap clips on the trim to re-seat any that are loose or pull the actual clip out of the door and reattach them to the trim for when you later need to reinstall it.
Most likely, all 4 of your cable ends are broken by this point and some may already been physically disconnected from the mount point thanks to the broken plastic end. The cables are still connected, but does not work because they are allowed to slip around too much.
9) On the TOP DOOR latch (either side) , mark around the 2 bolts (using a sharpie) to make it easy to put them back EXACTLY where they were making realignment a no brainer when re-attaching them. Once done, remove them with a 10mm or 12mm socket. DO NOT TRY TO DISCONNECT THE CABLE FROM THE LATCH!!!! If the cable itself is not broken and still moves the latch when you pull on it , leave it be.
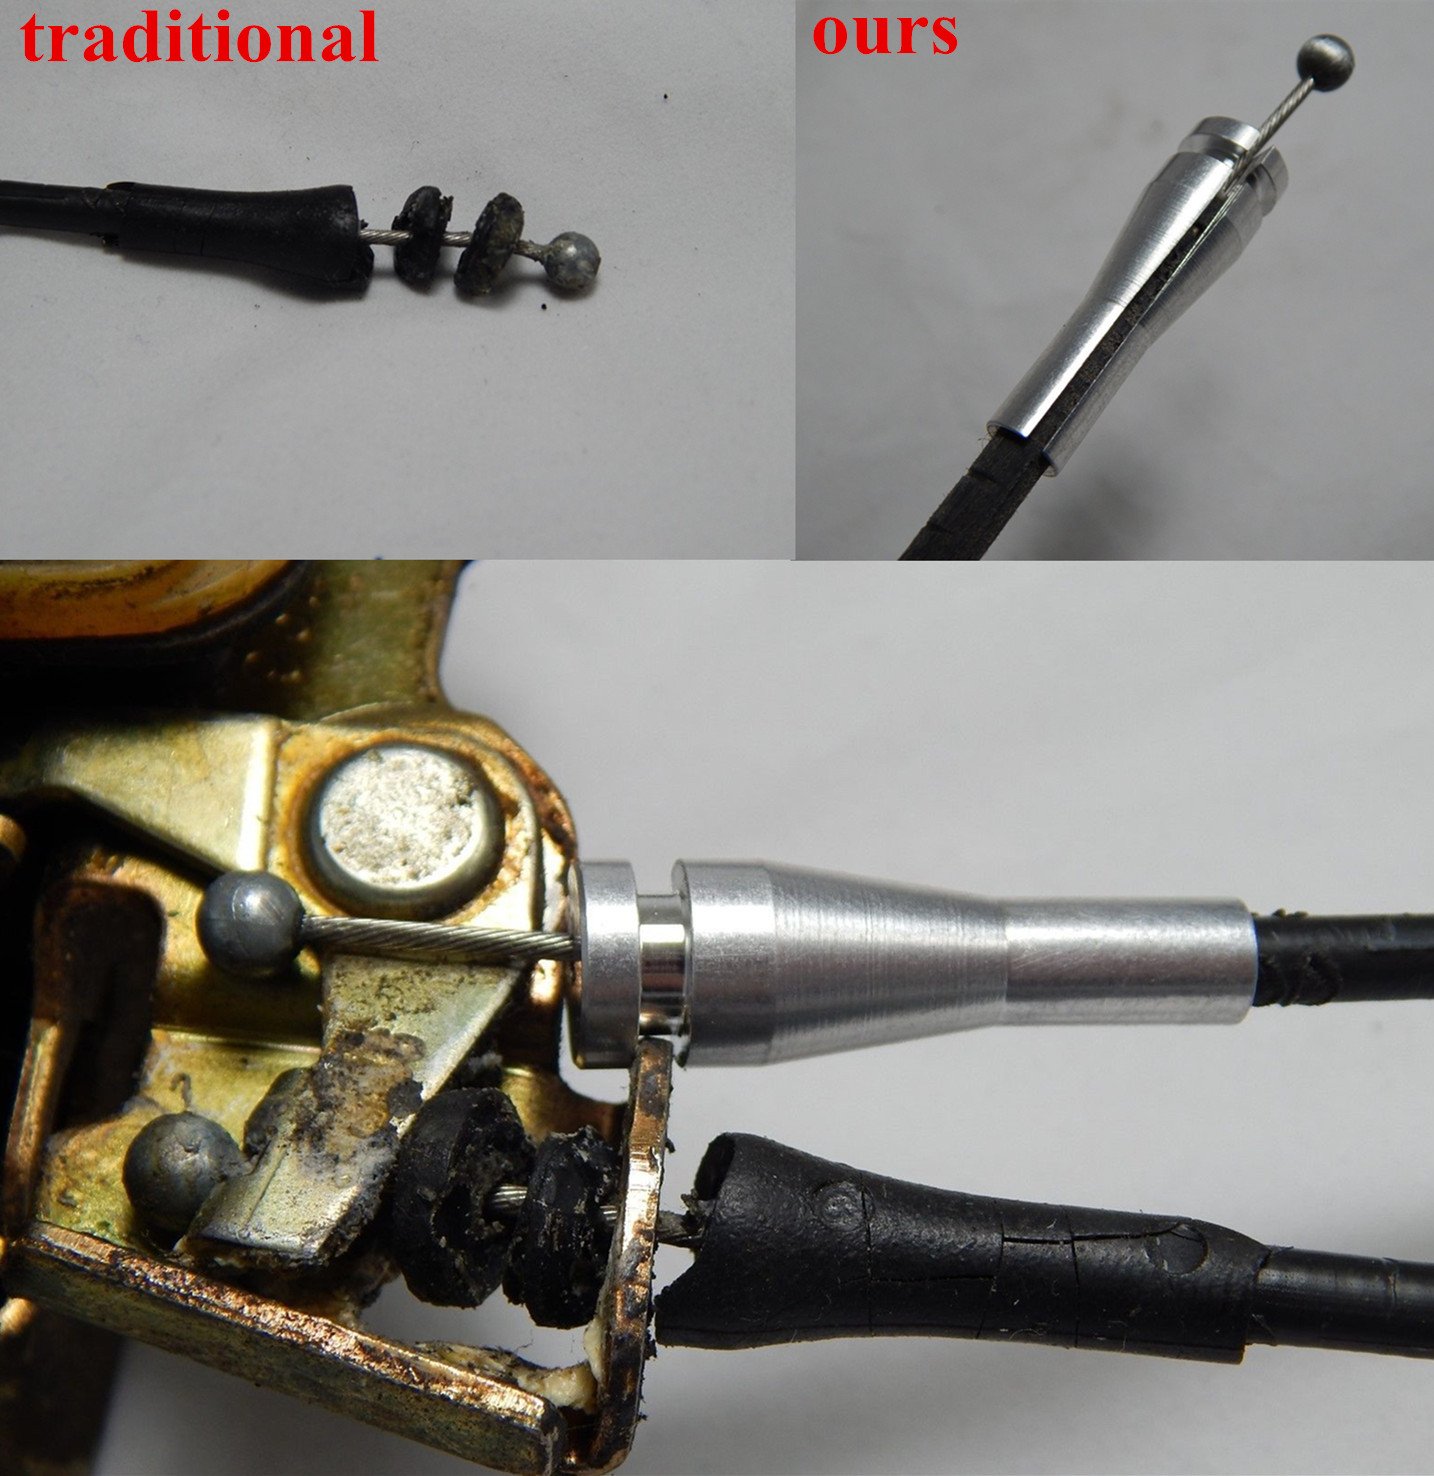
10) You will need an Exacto knife (or box cutter) to slice off the hard plastic cover and end. Try not to cut off the cable sheath, just slide the knife up edgewise starting just below the lower end of connector bulge and cutting thru all the way up and thru the plastic knurl on the end. It is not hard if the cutter is super sharp. Most if it is probably gone already, you just need to get the rest off. Even if you cut some of the cable plastic sheath, no big. But you do have to get anything that is not the same width as the cable and sheath off to slip on the replacement metal end later.
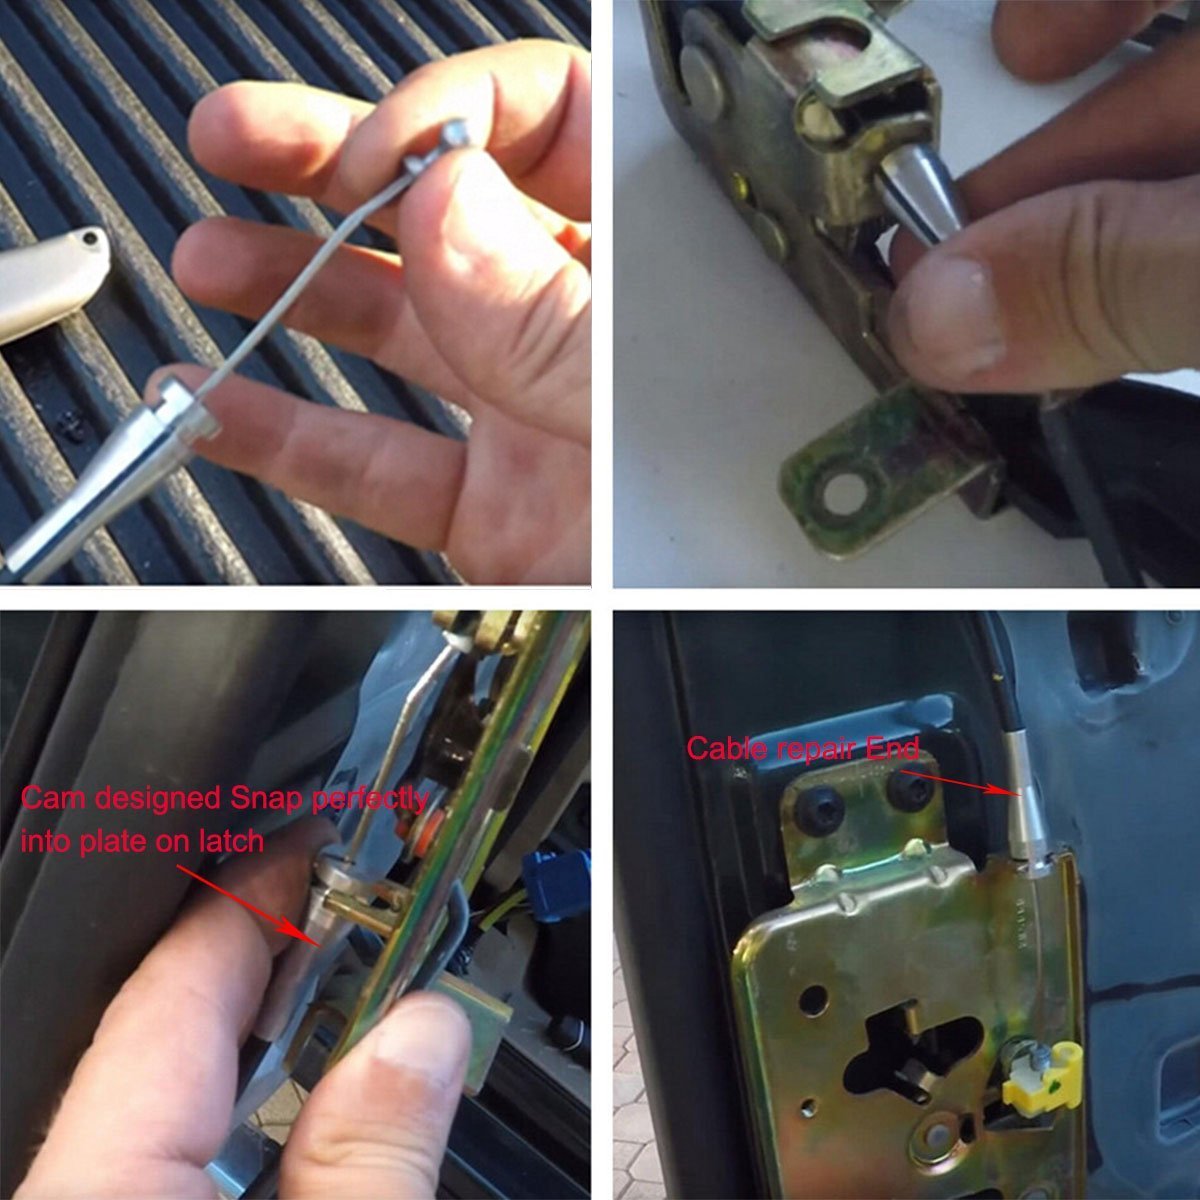
11 ) On the top latch mechanism (either side), you MUST use the replacement end with the Cam lock on it (one side is squared off). If you bought the set of 8, only 2 have this end – the other 6 are the same. Think of it as a slip cover. Slide the metal replacement over the cable and sheath and push/pull it down over the cable until the top of the replacement end is seated at the end of the top of the plastic sheath covering the cable.
12) On the top latch mechanism, you may need to turn/twist the cable in order to insert the cam lock into the hole, and one inside, allows the cam to be turned at least 90 degrees to insure that it won’t just fall out when reinstalled. Once the replacement end cam is inserted and holding itself in the latch, let the whole thing hang loose.
13) You need to remove 2 T25 screws from the door handle. DO NOT REMOVE THE ATTACHED CABLES from the door handle mechanism. Notice that the door handle has two plastic clips that are used to secure the cable to the door handle. Just let it all hang loosely together for now.
14) On the lower latch mechanism, you will want a light to help you see. You will need to slip the cable end out of the lever that holds it. Most likely, the plastic holder is already shattered making it easy to do so, but if not, you will need to pop the plastic cable holder out of its spot, and then you can pull the actual cable up and slide out of the latch lever fairly easily. So, for the lower latch, you DO want to remove the cable from the latch mechanism without removing the latch at all. Different from the top latches.
15) Now that all 4 cable ends are loose and easy to move around as needed, you again cut off each of the 3 remaining plastic end(s) from the cable(s) without cutting the cable or sheath (if you can help it). Just make sure that the plastic end and knurl are gone from the cable. When cutting off the ends that are going into the door handle mechanism, now is the time to release to two clips ( a needle nose plier to squeeze the ends and slide the locking clip outward allows the whole cable end to drop down making it easy to see and cut off the old plastic garbage and most likely flush out the broken pieces rattling around in it. There is no need to actually disconnect the cable from the door handle mechanism to do it. Just a good sharp box cutter or Exacto knife.
16) Taking any one of the remaining 6 metal replacement ends and again, like a slip cover slide the end over the cable and push/pull it down to seat it on the cable properly. Repeat for the other 3 ends on the door.
17) On the lower latch mechanism, slip the cable end back into the lower latch lever.
18) You will likely need a pair of channel locks or Lock Jaw pliers to press and snap the round groove of the metal replacement end back into holder on the latch mechanism. You will hear/see/feel it when it locks into place. That is key. You NEED that groove LOCKED into the holder, or you have wasted your time. Once secured, the bottom latch cable end is done.
19) Making sure the two clips of the door handle mechanism are back in place and holding the two new metal replacement ends correctly in place, put the door handle back into the door and screw back in the two T25 screws securing it into place.
20) Using the two bolts you removed from the top latch, while making sure that the cam lock is still in place holding the cable into the latch mechanism, insert the latch back into the door, and lightly screw the bolts into the top door latch. Once they lightly hold it in place, move the latch around until the two screws align with the markings on the latch cover that you did earlier and then once in place, fully tighten both bolts.
21) At this point you should have no problem closing and opening the door. Try it a few times before you finish up. If you need to adjust the top mechanism to make sure it releases and opens and closes and latches correctly, now is the time to do it.
22) Making sure all of the clips are in place and ready for reinserting, gently push and snap lock all of the trim clips back into place. Then replace the 6 phillips screws in the trim. The two middle screws are slightly bigger than the 4 upper lower ones – FYI.
Repeat these steps for the other side. Good luck. If done right, you should never have to do this again, unless the cable itself breaks.
Justin S. Martindale –
Based on other reviews here I tried these with my 2006 Dakota extended cab and they worked perfectly. The install is a little tricky, but if you follow the instructions from user bagoggans review of this product and/or a couple of vids online it will be much easier. I would recommend replacing both doors ends while you have the tools out and save yourself the trouble in the future.
Luis –
Buena entrega y calidad…
WillyB –
I bought 8 of these to repair both rear door latches on my 2005 Ford F150 Extended Cab. Not sure what the original cable latch ends were made of (plastic?), but they had totally disintegrated or were about to. These replacements being aluminum, I doubt will suffer the same fate.
After watching a couple of You Tube videos I tackled the replacement project. It was really pretty easy. The most difficult part was getting the ends pushed down far enough over the rubber cable sheathing. I’ve seen many comments about this same issue. I solved the majority of it by lubing up the sheathing with a little water and dish soap. There were a couple that did not want to cooperate and I ended up having to sand down the ridges on the sheaths a little.
Thank goodness I found these things! Wa-a-y cheaper than $300 the dealer wanted for the parts to replace the whole door latch assembly. I found the dealer had no idea what I was talking about when I inquired about these cable ends? If the rear doors on your Ford pickup won’t open, these cable ends are likely your huckleberry. If you have some mechanical ability I highly recommend going this route.
TexasGonzo –
I wish these had been invented years ago! Maybe they were and I just missed them, but I sure am glad I finally found out about these little wonders. These are SUPER easy to install, and will forever end your door cable issues. I’ve made my own repairs in the past, which would last a year or two, then fail. I can’t see a single reason for these to fail, EVER. They’re precisely machined from billet aluminum, and fit my 2001 F250 perfectly. The set includes 4 with round slotted ends, and 4 key-hole slotted ends. This is enough to fix both back doors on the typical supercab Ford, which has 2 cables per door. You won’t regret spending your hard earned money on this set… they’re a fraction of the cost of even a single door cable at the stealership.
Martin Lachance –
Parfait