 Frete Grátis em todos os produtos
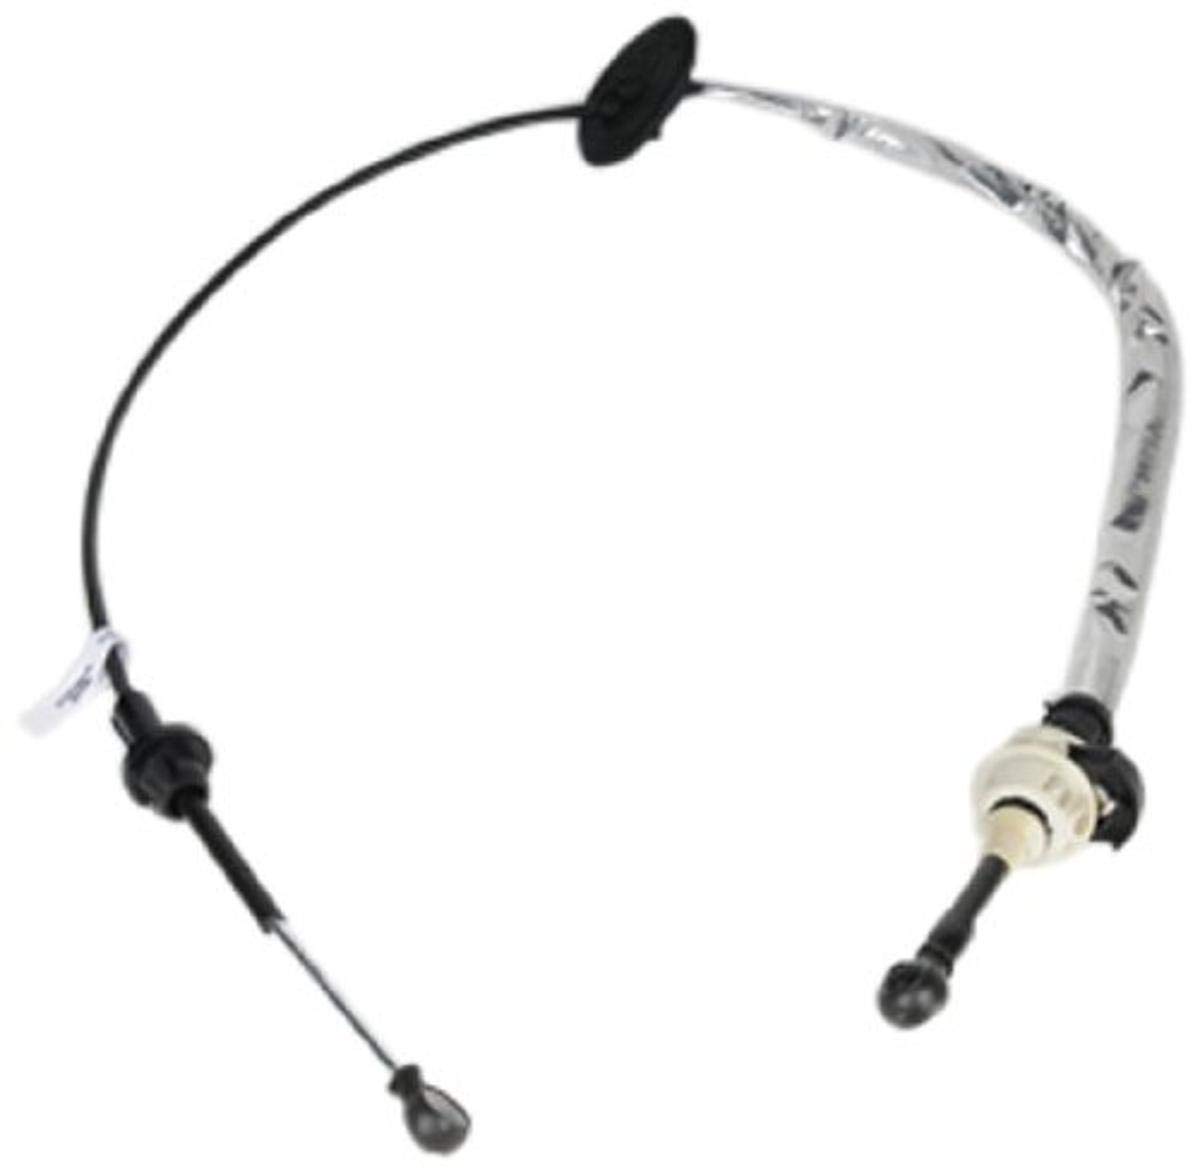


Descrição do Produto: ACDelco 22737100 GM Original Equipment Automatic Transmission Control Lever Cable
O cabo de controle da alavanca de transmissão automática ACDelco 22737100 é uma peça essencial para o funcionamento adequado do sistema de transmissão dos veículos Chevy Cavalier (2002-2005) e Pontiac Sunfire (2002-2005). Este componente, fabricado com rigorosos padrões de qualidade no México, garante uma operação suave e precisa da transmissão automática, proporcionando uma experiência de condução superior.
Com dimensões de embalagem de 17,25″ de comprimento, 16,5″ de largura e 4,5″ de altura, e um peso de apenas 0,51 lbs, o ACDelco 22737100 é leve e fácil de manusear, facilitando a instalação e substituição. Este cabo é projetado para se encaixar perfeitamente nos modelos especificados, assegurando que a troca de marchas ocorra sem falhas, o que é crucial para a segurança e eficiência do veículo.
Instruções de Uso:
Para utilizar o cabo de controle da alavanca de transmissão automática ACDelco 22737100, siga os passos abaixo:
1. Desconexão da Bateria: Antes de iniciar a instalação, desconecte a bateria do veículo para evitar qualquer curto-circuito.
2. Remoção do Cabo Antigo: Localize o cabo de controle da alavanca de transmissão antiga e remova-o cuidadosamente, desconectando as extremidades do cabo.
3. Instalação do Novo Cabo: Insira o novo cabo ACDelco 22737100 nas mesmas posições do cabo antigo, garantindo que esteja bem fixo.
4. Conexão da Bateria: Reconecte a bateria e teste a alavanca de transmissão para garantir que as marchas estão mudando suavemente.
Características do Produto:
– Tipo de Produto: Peça Automotiva
– Dimensões da Embalagem: 17,25″ L x 16,5″ W x 4,5″ H
– País de Origem: México
– Peso da Embalagem: 0,51 lbs
– Detalhes de Ajuste: Compatível com Chevy Cavalier (2002-2005) e Pontiac Sunfire (2002-2005)
– Material de Alta Qualidade: Fabricado com materiais duráveis que resistem ao desgaste e à corrosão.
– Instalação Simples: Design que permite uma instalação rápida e fácil, reduzindo o tempo de inatividade do veículo.
– Desempenho Confiável: Proporciona uma troca de marchas precisa e responsiva, melhorando a performance geral do veículo.
Perguntas Frequentes (FAQ):
Pergunta: O cabo ACDelco 22737100 é compatível com outros modelos de veículos?
Resposta: Este cabo é especificamente projetado para os modelos Chevy Cavalier (2002-2005) e Pontiac Sunfire (2002-2005). Para outros modelos, recomenda-se verificar a compatibilidade.
Pergunta: Como posso saber se preciso substituir o cabo de controle da alavanca de transmissão?
Resposta: Sinais de desgaste incluem dificuldade em mudar de marcha, ruídos estranhos ao trocar de marcha ou a alavanca não retornando à posição correta. Se notar esses sintomas, a substituição do cabo pode ser necessária.
Pergunta: A instalação do cabo requer ferramentas especiais?
Resposta: Não, a instalação do cabo ACDelco 22737100 pode ser realizada com ferramentas básicas, como chaves de fenda e chaves de boca.
Pergunta: O que devo fazer se o cabo não funcionar corretamente após a instalação?
Resposta: Verifique se o cabo está instalado corretamente e se todas as conexões estão firmes. Se o problema persistir, consulte um mecânico qualificado.
Pergunta: Existe garantia para o cabo ACDelco 22737100?
Resposta: Sim, a ACDelco oferece garantia para seus produtos, garantindo a qualidade e a durabilidade do cabo de controle da alavanca de transmissão. Verifique os termos específicos da garantia no momento da compra.


Ibukun Udje –
2004 Chevy Cavalier Eco 2.2 Engine
Followed one of the procedures posted on here. Hardest part for me was getting the end of the cable by the engine, out of the bracket holding it in place. I disconnected the cable from the transmission lever, took the black pin out, and then the difficult part was pushing the plastic clips together in order to get the cable to slide out of the bracket. It was hard to depress the clips due to the lack of room. So eventually, I had to break them off. Replacing the new cable was pretty smooth. As Martin said, do not push the black adjustment pin (under the hood) back down until you’ve adjusted the gear positions (at the shift selector end and at the transmission end – make sure they are both in “Park”) Otherwise, your gear positions will be off (I made the same mistake). Upon setting the adjustment right, you should be in good shape. This saved me hundreds of dollars and it was a good learning experience!!!
Edit this post | Permalink
BH6W –
I needed a shift cable for a 1995 Cavalier, 4 speed automatic. The few places I could find it online had it for $60+, I got it for $20 less here on Amazon Prime, and had it in one day, free shipping. Didn’t know Amazon had a “garage” application which lets you punch in your car’s info and find parts. Their system is actually better/faster than the two major Auto repair shops here locally (Autozone / Advance), who didn’t even carry it.
There was some confusion online about whether to use this cable or another one, depending on engine size and VIN. I took an educated shot in the dark and this was the one for me, for a 4-speed trans.
Installation was simple and took about 30 minutes:
1. Lift the front of the car, ramps work perfectly. MAKE SURE to set the parking brake and put bricks behind the wheels just to be safe!!! <– DO IT
Note: Did you engage the parking brake and put bricks behind the tire? If not, DO IT
2. Disconnect the cable from the shift lever on the transmission. This can be done from the engine bay, or if you’re like me, it broke off so you’re good to go. Place the shift lever into park by pushing it as far “forward” (toward the front) as it will go.
3. Disconnect the cable from the cable holder just behind the shift lever on the transmission. I did this by hand from up top.
4. Go into the car and remove the center console. There’s a few screws. You can find a how-to online. There’s a hidden screw in the front compartment closest to the firewall, under a plastic cap. That one took me a minute to find.
5. Once the console is out, remove the gear-shift. There’s a pin holding it in place and then it slips up and off.
6. Disconnect the cable from the shifter
7. I found that routing the cable under the dash frame annoyed me, and with the carpet covering it, it was near-impossible to remove. So I cut the “lip” of carpet in half. You’ll know it when you see it. Once you do this, the cable can be freely pulled clear of the dash frame thingy.
8. Go under the car, pull the cable out from underneath.
9. Installation is opposite of removal. Connect the cable to the shifter first, then put it in park. Your transmission lever should be in park from step 2. See if you can connect the cable. You may have to adjust the “depth” adjuster (you’ll know it when you see it) before the cable will connect and also lock into place on the cable holder. You may also find it easier to shift the transmission out of park and into another gear by hand, in order to get the cable to clip into place.
I’m an experienced mechanic and this only took about half an hour, but anyone with the most basic screwdriver skills can accomplish this. If not, get one of your buddies to help. Save yourself the money from paying someone else to do it, they can’t warranty their work on this anyhow.
Ricardo Rodriguez –
Fit in a Chevy 2004 cavalier , no problems easy install
Martin Brown –
I used this part on my wife’s 2003 Chevrolet Cavalier, 4 speed auto. It is a perfect factory replacement, however I did notice that the heat shielding wrap was considerably thinner than the original. Route it away from the exhaust if possible.
Follow THESE directions if you have a 2003-05 model Cavalier with 2.2 Ecotec Engine. They differ from earlier models because there is a LOT of room behind the 2.2 which makes access to the cable possible without having to raise the vehicle.
1. Disconnect the Negative (-) battery cable.
2. Remove the center console. You can also remove either seat to gain more access, that is however optional.
2a. Remove the shifter handle by pulling the clip out of the front and lifting straight up.
2b. Remove the window control panel using a flat head screwdriver and disconnect the electrical connection.
2c. There are 2 bolts inside the console, 1 under a cover in the front map tray and 1 more under the control panel for the windows.
2d. Ensure the parking brake is raised as high as possible, then lift up on the console to remove. Be sure to unclip the connector for the 12V socket on the passenger side if so equipped.
3. Remove the panels below the dash that sit in front of the console. There are 2 bolts either side and you can use either torx screwdriver or sockets on them.
4. Using a knife or scissors WITH CARE, continue the cut of the carpet all up to the front in the middle. If you don’t want to cut the carpet, then you will need to pull it back until you can get good access to the shifter cable – but that is much more work, and the cut will be hidden by the console anyways.
5. Remove the S-Shaped air intake tube. This allows more access to the end of the cable on top of the transmission.
6. Remove the metal U clips on both ends of the cable which hold them in the bracket, and push the plastic clips together so the cable pushes back through the bracket.
7. Pop the end of the cable from the transmission and the end from the transmission.
8. Raise the floor air ducts enough so you can pass the cable underneath, then use a screwdriver to pry the large rubber grommet from the firewall and in to the car. Feed the rest of the cable through and remove from the vehicle.
9. Installation is reverse. Be sure to re-install the metal U clips where they go. Also be sure that the lever on the top of the transmission is rotated all the way counter-clockwise (the transmission is in Park) whilst the gear selector is in the P position. When you are sure that it is in the correct position, press down on the black plastic clip to lock the cable adjustment in place.
Another point to note: There is a bulb under the shifter that illuminates the gear selections when the headlights are turned on. If you notice that they don’t light up, that bulb is probably blown and now is a perfect time to replace it. It is a size 194 and located under the plastic cover with all the Letters & Numbers.
C. Defreese –
Perfect fit. No instructions on how to install, so better check out youtube or know how to on your own. Great price for a name brand part. Local stores were asking $20+ more for a generic replacement part. Took a few days longer to ship then I was expecting, else I’d give it a 5 start.
mazziel –
The media could not be loaded.